- Like
- SHARE
- Digg
- Del
- Tumblr
- VKontakte
- Flattr
- Buffer
- Love This
- Save
- Odnoklassniki
- Meneame
- Blogger
- Amazon
- Yahoo Mail
- Gmail
- AOL
- Newsvine
- HackerNews
- Evernote
- MySpace
- Mail.ru
- Viadeo
- Line
- Comments
- Yummly
- SMS
- Viber
- Telegram
- JOIN
- Skype
- Facebook Messenger
- Kakao
- LiveJournal
- Yammer
- Edgar
- Fintel
- Mix
- Instapaper
- Copy Link
Take Your Legs to Whole New Level by Sculpting Your Calves
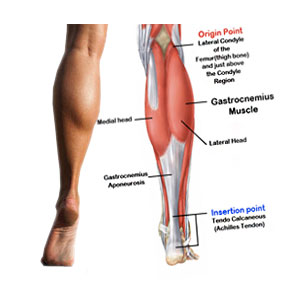
A great set of calves is always eye-catching. Whether in heels or flip flops, skirts or skinny jeans, the curve of your calf goes a long way toward defining the line of your entire leg. Strong calves will also help your functional activities such as walking, running, hiking, dancing, and much more. Developing your leg muscles also helps prevent injuries.
Good news for you: you don’t need to spend a ton of time working your calves to build, define, and tone those lower leg muscles. When you focus on the major lower body lifts such as squats, deadlifts, and lunges, and add in a of couple effective calf isolations, you’ll be well on your way to developing and defining your calf muscles. There are different approaches for toning and defining versus bulking the calf muscles, so read the article thoroughly to ensure you are taking the best approach to achieve your specific goals.
In this article, we will detail a lower body workout that places special emphasis on the calves while also working the glutes, hamstrings, and quads to allow you to get more done in less time. We will also go over calf anatomy, tips and guidelines for getting the most out of your calf workouts, foam rolling and stretching exercises to keep your calves from getting too tight from your workouts, as well as detailed descriptions of each and every best calf exercise in the best calf workout. Keep reading!
Basic Calf Anatomy
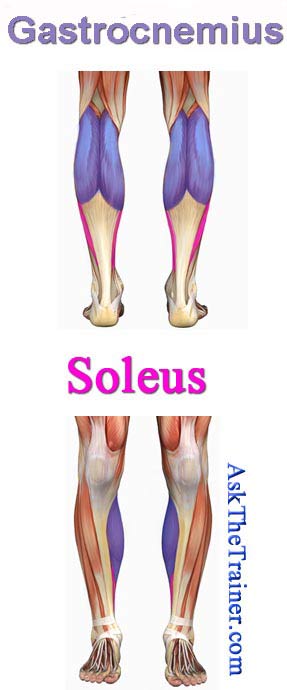 Each of your calves is made up of two muscles: the gastrocnemius and the soleus.
The gastrocnemius is the larger, more superior muscle that you can see when you stand on your tiptoes. This two-headed muscle attaches to the back of the heel via the Achilles tendon and also crosses the knee joint to attach to the back of the femur, meaning it can move both the ankle and knee joints. The gastrocnemius’ action on the lower leg is to flex the knee, bringing the back of the calf to the back of the hamstring; its action on the ankle is to plantarflex the foot, or point the toes downward.
The other muscle that makes up the calf is the soleus, which is underneath and below the gastrocnemius. Like the soleus, it attaches to the back of the heel via the Achilles tendon. While the soleus is less fleshy and prominent, it is a strong and important postural muscle for your lower leg. The action of soleus is to plantarflex the foot, pointing the toes downward.
Tips and Guidelines for the Best Calf Workout for Women
 Check out each and every tip in this list to make sure you are being smart about your calf workouts so you can get the most efficient results and waste no effort.
- If you are beginning strength training for the first time or after having some time off, work on the endurance of your muscles and connective tissues; aim for a high rep range of about 15 reps per exercise at a light weight that produces a good burn but not total fatigue
- After about a month, encourage your muscles to continue making progress by cycling through a strength phase of 8-10 reps per exercise at a weight that produces fatigue within that number of reps
- A simple scheme to keep the progress going is to cycle between the two lifting styles described above every month to two months; you will notice the weight you are able to lift in each rep range increases each time
- For the best results, work your calves, thighs, and glutes two to three times per week on the same day
- Any muscle needs about 48 hours rest between workouts; calves are no exception, so work your calves/lower body on alternating days
- Perform at least two sets and up to four sets of every exercise in the workout, resting 30-60 seconds between sets
- When choosing a weight, pick one that is difficult enough to produce a good burn and a feeling of fatigue by the last rep or two
- If you are unsure of your starting point, always err on the side of too little weight and add more next time if the set was too easy
- Especially at the very beginning, be careful with your calves; don’t go too crazy seeking muscle fatigue…you will risk ankle and knee injury if the weight is too heavy and your form falls apart because you’re not ready
The Best Calf Workout for Women: Overview
 Here is an overview of the exercises that make up the best calf workout that you can print and take to the gym with you. Do the exercises in the order they are written, starting with a warmup, moving from the largest compound movements to the smaller isolations as the workout progresses, and finishing with a stretching cooldown to help your muscles relax back to their normal resting lengths and avoid excessive soreness.
1) WARMUP
- General Cardio for 5 minutes
- Active Warmup: 15 bodyweight squats, 10 lateral lunges each direction, 15 bodyweight calf raises
2) WORKOUT
- Deadlifts – 2 to 4 sets
- Squats – 2 to 4 sets
- Lunges – 2 to 4 sets
- Seated Calf Raise – 2 sets
- Standing Calf Raise – 2 sets
3) COOLDOWN
- Stretch Calves, Hamstrings, Quads, Hips
Details on Perfect Execution of Each Best Calf Exercise
Now that you have seen the overall structure of the workout, let’s dig into the details of each exercise to make sure you understand how to perform each move safely and for maximum effectiveness.
THE WARMUP
 Warmup: General Cardio for 5 minutes
Many different activities that elevate your heart rate to a moderate feeling of exertion for a solid 5 minutes count for your general cardio warmup. You can walk, jog, climb stairs, ride a bike, use an elliptical, ARC trainer, or other cardio machine. The purpose of the cardio warmup is to get blood pumping to your muscles and connective tissues so you can do the tougher exercises to come safely.
Active Warmup: 15 bodyweight squats, 10 lateral lunges each direction, 15 bodyweight calf raises
After you complete a 5 minute general cardio warmup, best practice is to do some sets of light movements that mimic the joint motions of the more demanding exercises in the workout that is coming at you. This helps prevent injury by allowing you to practice, warming up your joints in those particular ranges of motion, and activating the muscles you will be using.
Do at least 15 squats just using your bodyweight as resistance, feeling your muscles stretch and your hips and knee joints warming up as you get more range of motion throughout the warmup set. Next, do at least 10 lateral lunges each direction by standing with a wide stance and shifting your weight to one side at a time, sitting back into your hips and sinking toward the floor as you keep the bending leg’s knee right above the ankle and feel a good stretch in the inner thigh of the other leg. Finish your active warmup with at least bodyweight calf raises: touching a wall or doorway for balance, rise up onto tiptoes, feeling a good pump as you flex and release your calf muscles.
If you are prone to muscle tightness in your calves, hips, or hamstrings, or you have corrective posture issues to work on, adding foam rolling and stretching to your warmup will be helpful. If you are biomechanically healthy, you can afford to skip foam rolling and stretching during the warmup and just do those activities during your cooldown to save yourself time.
THE WORKOUT
1) Deadlifts – 2 to 4 sets
The deadlift is an amazing exercise that is deceptively simple. When you deadlift something, you are simply lifting the object from the floor to hip height in the most functional way possible. It’s exactly what people mean when they say “lift with your legs and not your back”. Deadlifts work the entire posterior chain including calves, hamstrings, glutes, low back, upper back, and even your neck. They are an efficient way to tone, sculpt, define, and add muscle mass to the back of your body. However, there is a lot that can go wrong in a deadlift so let’s discuss how to do them right.
How to do a Deadlift:
A kettlebell is a good starting form of resistance when you are learning to deadlift. They are more forgiving than a barbell because they won’t scrape up your shins or bang up your knees. Kettlebells are also easy to set up. Grab a kettlebell of your chosen resistance (remember to experiment with one that feels fairly light at first) and hold it by the top of the handle. Think “top down organization”; straighten your neck, squeeze your shoulder blades together, tighten your core, and hinge your hips back, pushing your butt behind you. Sit back into your hips, bending your knees and keeping your knees directly above your ankles as you lower the kettlebell toward the floor. Keep your back absolutely flat and your gaze leveled at the horizon as you go down. Hover the kettlebell right above the floor, then stand back up by straightening your hips and knees at the same time. Make sure to drive the movement by squeezing your glutes and pushing your hips forward. Stand all the way tall with hips “locked out” or completely straight at the top of every single rep.
2) Squats – 2 to 4 sets
You must deadlift, and you must squat. You can’t afford to skip either one if you want to develop your calves and lower body! While a deadlift is a pulling movement, a squat is a pushing movement. Like the deadlift, squats work calves, hamstrings, and glutes; the main differences are that squats also place a lot of emphasis on the quadriceps on the fronts of your thighs, and squats train the pushing movement pattern in contrast to the deadlift’s push dynamics.
How to do a Squat:
Work your bodyweight squats to perfection and full range of motion before you add resistance. Start standing tall, then reach back with your hamstrings and sit your butt back like you are going to sit into a low stool positioned a little bit behind you. Keep your core strong and your chest and gaze high. For a full range squat, get your hip crease to knee level or slightly below. If squats bother your knees, it is highly likely you are bringing your knees too far forward. Make sure your knees never push forward past your toes as you squat. As you stand back up, push the floor away and squeeze your glutes as hard as you can, tightening your core further. Like a deadlift, you need to “lock out” your hips at the top of the rep for maximum effectiveness.
3) Lunges – 2 to 4 sets for each leg
Lunges allow you isolate one side at a time to reveal and work on your weaknesses. You’ll strengthen, develop, and tone your butt, hips, thighs, and of course your calves. When you do lunges with proper form, you strengthen a lot of stabilizing muscles that are of great assistance in injury prevention.
How to do a Lunge:
Think of a lunge as a hugely exaggerated walking step. When you’re learning to lunge, try stationary lunges first. Choose one side to work first and take a stance wide enough that at the bottom of the lunge, your front knee forms a 90 degree angle with your knee directly above your ankle. At the bottom of the lunge, your back knee hovers right above the ground; when viewed from the side, you should be able to visualize a straight line from the top of your head, through your torso and down your thigh all the way to the back knee. It will take a little trial and error to find an optimal stance length for your lunge, as it varies by leg length. Longer legged people will require a longer stance. As you lower down to the bottom of the rep, keep your chest lifted, core tight, and torso straight up and down. As you stand up, push your weight into the front heel, making sure your knee doesn’t collapse inward or outward. If you need help balancing, put your fingertips against the wall until you get more comfortable. Once you are good with bodyweight lunges, try adding resistance by holding dumbbells in your hands at your sides, or holding a kettlebell to your chest.
4) Seated Calf Raise – 2 sets
Now that we’ve completed the main lower body exercises (deadlift, squat, lunge), let’s give the calves some extra love with two effective calf isolations, starting with the seated calf raise. Your gym will likely have a seated calf raise machine. You’ll sit with your knees and hips at a 90 degree angle and press into the balls of your feet to push up onto your “tiptoes”. Being seated in this way takes the hamstrings and quads out of the equation and allows you to really isolate the calf muscles.
How to do a Seated Calf Raise:
Different gyms will have different styles of seated calf raise machines, so make sure you follow the directions on the individual machine. A form tip that holds true no matter the machine style is that you will need to hang the back of your foot off the platform and go for a good stretch at the bottom of the rep before pushing into the ball of your foot and contracting your calf to rise up to the top of the rep. Always keep your ankles straight and stable as you push up to the top of the rep. If you let your ankles roll in or out, you risk seriously injuring them at worst and working them unevenly at best.
5) Standing Calf Raise – 2 sets
Use the standing calf raise as a calf burnout at the very end of the best calf workout. This exercise will allow you to fully fatigue your calf muscles so you finish your session with the satisfying feeling that your calves have been completely worked out.
How to do a Standing Calf Raise:
Find a step and bring it next to something you can hang onto and use for balance. Tip: if your gym has a standing pull up/dip assist machine, that can work perfectly on its own (as long as you’re not tying it up if someone is waiting to use it for pull-ups or dips!). Stand on the step and hang on to whatever stable balance aid you’ve found. Hang the back half of your foot off the back of the step and lower down so your calf gets a good stretch. Then, push into the ball of your foot to rise up onto your “tiptoes”. Once you are comfortable, work one leg at a time by balancing on one leg and tucking the other foot behind the calf that is working. You may find that two sets of bodyweight calf raises are enough to feel a good burn at the end of your workout, or you may need to hold a kettlebell or dumbbell in your free hand to add extra resistance. Just make sure that your ankle works straight up and down and doesn’t collapse inward or outward.
THE COOLDOWN
Foam Roll and Stretch Calves, Hamstrings, Quads, Hips
To restore your muscles to their optimal resting lengths and prevent becoming excessively sore for the couple of days following your workout, it’s best to cool down after your calf workout by using the foam roller and doing some static stretching.
Foam rolling and static stretching utilized after every workout is going to be a godsend when it comes to muscle recovery, trust me on this one.
Do all your foam rolling first, 30 seconds per area, then move on to static stretching, also 30 seconds per area.
To use the foam roller, simply position it under the body part you would like to roll out and drop your body weight onto the area as you roll. For example, rolling your calves is best accomplished by sitting on the floor with straight legs and placing the meaty part of your calves on the foam roller. Roll up and down, hunting for any areas that feel particularly tender and lingering there.
The foam roller works in the same way as a deep tissue massage to relax tight muscles and break up any areas that are chronically tight or contain tissue adhesions. Don’t forget to roll both heads of the gastrocnemius: both the inner calf and the outer calf. You can also spend some time rolling right under the meatiest part, targeting the soleus and Achilles tendon.
After foam rolling, stretch the areas you have chosen to roll. The most effective calf stretch is performed by standing in a split, lunge-like stance with your palms against the wall. Straighten the back leg, pushing your heel into the floor. Ensure that your back toes are pointing straight at the wall and not out at an angle, otherwise you won’t receive an even stretch on both heads of the gastrocnemius.
Toning and Defining Versus Bulking the Calf Muscles
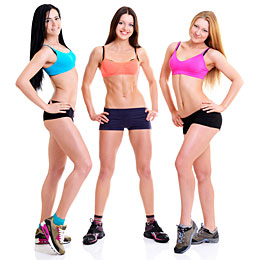 You will want to take a different approach to your calf workouts if you seek to simply tone and define rather than add bulk. If you fall into the first category, take it easy on the calf isolations. You can do them once a week but I wouldn’t recommend doing them more often, or else you may add unwanted bulk to the calves. If, on the other hand, you do want to add bulk to the upper curve of the calf, go ahead and do your calf isolations every lower body day (two to three times per week).
Some women build calf muscles easily with weight training and end up with more than they bargained for. Some women struggle to build the calves and have to work harder to make progress. Keep an eye on those calves and adjust your training approach depending on the results you are seeing versus the results you would like to see.
Best Calves Workout for Women: The Bottom Line
Thank you for reading my calf workout article all the way to the very bottom. My hope is that at this point, you feel confident and empowered with all the information you need to give your calves and lower body an excellent workout. If I missed any of your favorite calf exercises or calf building tips, or you find yourself with unanswered questions, be sure to let me know in the comments below!
Best Calf Exercises to Build Strong, Sexy Calves!
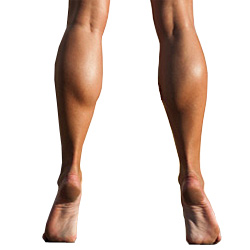
Are you paying enough attention to your calves in your exercise routine? Many women focus on typical “problem areas” such as the belly, butt, and thighs while neglecting the lower leg. It’s a mistake to neglect the calves, as they play a large role in posture and joint health, not to mention that a well-formed pair of calves is sure to turn heads during shorts weather.
The good news is that you don’t need to spend a ton of time on your calves to make them look and feel great. Many fitness activities you may already be doing can work the calves with no extra effort, however, a few simple calf exercises and calf stretches that are super easy to add to your current routine can truly optimize your calf area.
Additionally, there are a few key points I’ll go over about how your calves affect your posture and overall leg health that you will definitely want to read up on.
Keep reading to find out everything you need to know to exercise your calf muscles, including calf anatomy, calf muscles and posture, calf stretches for relieving excessive tension, exercise information and tips for maximizing calf workouts, and the best calf exercises for women, including videos.
Jump to the Videos of the Best Calf Exercises or continue reading to learn more.
Basic Calf Anatomy
 Two muscles comprise the calf: gastrocnemius and soleus. These two muscles work together to plantarflex the ankle, which is the action of pointing your toes downward. Gastrocnemius also helps other muscles to flex the knee, bringing the calf toward the back of the thigh.
Gastrocnemius: The Larger Outer Calf Muscle
Gastrocnemius is the larger and fleshier muscle of the two. It has two heads, a lateral head toward the outside of the calf and a medial head closer to the midline of the body. Both heads of gastrocnemius arise from the bottom back side of the femur. Gastrocnemius is made up of mostly type II or fast-twitch muscle fibers, meaning it is most effective and powerful during short bursts of activity.
Soleus: The Smaller, Deeper Calf Muscle
Soleus is located directly underneath gastrocnemius. It’s smaller and shorter, originating on the lower leg bones rather than the femur. In contrast to gastrocnemius, soleus is comprised of mostly type I fibers, which are made for endurance, thus slower to fatigue, making soleus a postural muscle. Without soleus’ sustained efforts at pulling your lower leg backward, you would fall flat on your face!
The Achilles Tendon: The Calf Muscles’ Connection to the Heel
Gastrocnemius and soleus join forces to form the Achilles tendon, which crosses over the ankle joint and inserts into the back of the heel bone. The Achilles tendon is the strongest tendon in the body, yet the most frequently injured, especially in women. Read the following information on calf muscles and posture problems to find out why and what you can do about it.
Calf Muscles and Posture Problems
Ladies, my hope is that the following information makes you want to seriously reconsider ever wearing high heels again.
Research studies have shown that wearing high heels causes significant shortening and tightening of the calf muscles and the Achilles tendon. The body will begin to permanently reflect any position it is forced into day after day. Why does this matter? Excessive tension in muscles and tendons makes them much more prone to injury.
A rigid Achilles tendon drastically changes the joint mechanics of the entire lower leg. Additionally, the muscles across the front of the ankle joint become elongated and weak, further disrupting normal ankle and foot function. The side effects of high-heel wearing echo throughout the kinetic chain, contributing to postural issues as well as plantar fasciitis, bunions, and foot problems such as overpronation, also known as flat feet.
If you’re a habitual heel-wearer, when you take off the heels to don your running shoes, the excess tension in your calf area combined with the weakness across the front of the ankle predisposes you to all kinds of nasty injuries, including strains and sprains. You may also experience muscle and connective tissue problems traveling up the leg to the knee, hip, and even lower back.
The issues caused by high-heel wearing can be reversed with time and care.
Research foot and ankle exercises to learn stretching and strengthening exercises for your whole foot and ankle complex.
Calf Muscle Stretches for Relieving Excessive Tension
If you read the section above, you will have learned that women who wear high heels tend to have excessively tight calf muscles. However, you don’t have to wear high heels to have tight calves; it’s quite a common problem for many women and men.
To perform a quick self-test to determine your level of calf tightness, simply perform a simple squat exercise. If your heels try to rise off the ground at all, your calves are excessively tight. This means you need to prioritize loosening your calf muscles through corrective flexibility exercises.
The best way to address tight muscles is through a combination of self-myofascial release and static stretching. Self-myofascial release is a flexibility technique in which you use a foam roller or other implement such as a tennis ball to give yourself a deep tissue massage. Watch the following video to learn how to use self-myofascial release to relieve tension in your calf muscles.
Check out the top-rated foam rollers on Amazon.com.
Static stretching is the classic stretching technique in which you assume a specific pose and hold it for at least 20 seconds. After using a foam roller, use the following calf muscle stretch to finish loosening the calf muscles. To further target the soleus muscle, bend your knee and hold the basic position shown in the video for an additional 30 seconds.
To learn more essential stretches for your lower body, read our article on Static & Dynamic Leg Stretches. Before doing any exercises, even stretches, it’s best to warm up by doing 5-10 minutes of light cardio exercise, such as walking, jogging, or biking.
Exercises Information on the Best Calf Exercises for Women
You’ll be pleased to learn that there’s not a ton of extra work required to build your calf muscles. Your calf muscle size and shape is largely determined by genetics. It’s unlikely that you will ever build large calf muscles unless it runs in your family. That being said, there is a lot you can do to improve the strength and muscle tone in your calves.
Gravity is your best ally when it comes to calf exercises. Think about it: your calves are already helping bear up your entire body weight any time you do any sort of exercise. Exercises in which your body is vertically positioned are the best for your calves. Some of the best calf exercises for women are activities you may already do as part of your active lifestyle.
Common activities that strengthen calves include:
- Running, especially uphill
- Hiking
- Climbing stairs
- Dancing
Other more specific activities that can be included as the best calf exercises for women:
- Cycling with clip-in cycle shoes, allowing you to work your calves when you pull the pedal upwards
- Weight lifting
- Football
- Soccer
- Tennis
One of the very best ways to work your calves is through plyometric exercise. Once thought to be only for elite athletes, plyometric exercise is quickly catching on among exercisers of all types because it’s super effective and fun! In plyometric exercises, you will hop, leap, bound, jump, crouch, and more. You will work many muscles, including but not limited to calves, in new ways that quickly improve strength and power. Check out our article plyometric training exercises to learn how to add plyometrics to your workout routine. This video here will also show you how to do jump squats, a plyometric exercise that is great for your calves.
If you lift weights (which essentially every woman exerciser from every age group should be doing!) the calves are being worked any time you are in a standing position.
Best Calf Exercises for Women
So now you have seen that many activities you are may do as part of your active lifestyle are already included in the list of best calf exercises for women. If you want to give your calves some extra love, add this one excellent calf toning and strengthening exercise to your lower body workouts.
As I said above, calf exercises are pretty basic, really requiring nothing more than your body weight. Ignore the calf raise machine at the gym, as it can put excessive pressure on your spine. You can achieve great results with the activities described above and with the simple body weight exercise I’ll describe below.
Be sure to warm up with 5-10 minutes of light cardio and do the calf stretches described above before performing the following best calf exercise for women.
Single-Leg Calf Raises
This is the only calf-isolating exercise you’ll ever need if you are an active woman. There are many variations of the calf raise, but I think the best one is the single-leg calf raise since you can be sure both of your calves are lifting the same amount of weight, which is not really the case when you have both feet on the ground.
To perform a single-leg calf raise, tuck one foot behind the standing leg so you’re balancing on one foot. You may want to be next to a wall or rail to lightly touch with your hands for balance. Stabilizing through the ankle, simply rise up slowly onto your toes, and then sink back down even more slowly. The lowering phase is just as important as the raising phase in strengthening your calves. Maintain an upright posture with all checkpoints in alignment: ear, shoulder, hip, knee, and ankle. Shoot for 20 reps, switch sides and perform on the other side, and you’re golden!
If single-leg calf raises are too challenging at present, it’s perfectly acceptable to put both feet on the ground so both calves are working together to lift your body weight.
As you get stronger, feel free to increase the challenge of the single-leg calf raise by performing a negative calf raise. A negative calf raise simply means that your heel starts lower than your foot. To perform a negative calf raise, all you need is a stair step. Start with the same body position described above for the basic single-leg raise, but let the back half of your foot hang off the stair step. Lower your heel as far as your range of motion allows, then rise up onto your toes just like a regular calf raise.
Again, with the negative calf raise, it’s totally fine to start with both legs and work up to one leg as your calf strength increases. Watch the following video to see a demonstration of negative calf raises.
As a final note, I want to point out the importance of balancing out your calf workouts with shin workouts to encourage muscle balance in the lower leg. Google shin exercises to learn how to work out the fronts of your legs. If you want to learn more about lower body workouts in general, a great starting place is our Leg Workouts page.
See also:
About Mae Barraclough
Mae Barraclough, B.S., NASM-CPT, NASM-CES is a certified personal trainer, corrective exercise specialist, and licensed Zumba Instructor. With her passion for health, fitness, and dance, Mae loves learning all she can and sharing her knowledge with others.
